Last year we looked at Hootsuite here on the blog and I thought it would be a good idea to share the same kind of information about other social media schedulers, so that you can make a more informed choice on what might be right for you. Today we are looking at the Buffer app.
What is Buffer?
Buffer is a social media scheduler which allows you to create content and post it out across varying platforms, like Facebook, Instagram, Twitter, LinkedIn, and Pinterest. These dates and times can be picked by you, based on your understanding of audience activity, or at a predetermined time the Buffer app has calculated given it’s knowledge and developer API keys with each social platform.
How do I find the Buffer free plan?
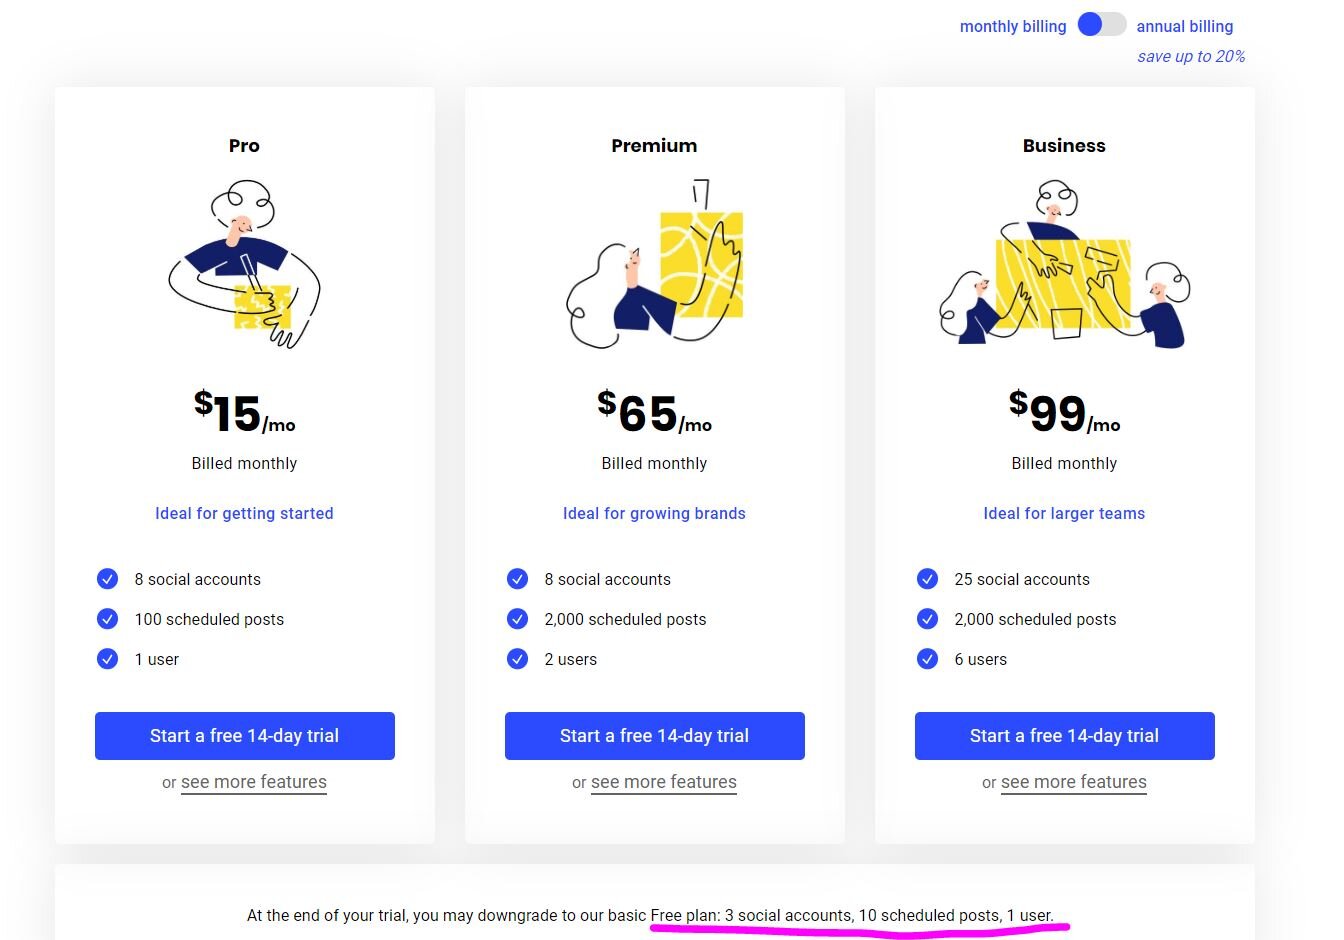
The Buffer free plan can be found on Buffer’s pricing page, just under each of the paid plan options.
You will see that Buffer currently say, ‘At the end of your trial, you may downgrade to our basic Free plan: 3 social accounts, 10 scheduled posts, 1 user.’ This means that you will have to add your credit card details to open an account and make sure to downgrade your plan before billing occurs.
Edit: 25th Jan 2021, tweet to me from Joel Gascoigne, Buffer CEO and co-founder 👇
To open an account all you need to do is follow the link and create your account password.
It is an amazingly simple and intuitive process to get started.
What do you get with the Buffer free plan?
As expected, there are several restrictions with the Buffer free plan, as with other scheduling tools. For example, you can only integrate with three social media profiles. In this case these are Facebook business pages, Facebook profiles, or Facebook groups, Instagram personal, or business profiles, Twitter, and LinkedIn page or profile.
On Desktop there will be a ‘Manage social accounts’ button in the bottom left menu bar. Click here and go through to the social account page. Here you can see I have selected three profiles to work with;
Go back to your dashboard to see how your profiles are displayed.
On Buffer you will find your profiles appear as tabs in the left menu sidebar and displayed next to these will be a number, zero to start, but once you start adding scheduled content you will see the number increase. It is important to note that you will get ten scheduled posts per account.
If you select one you will see exactly what you have scheduled;
Before you start posting away my best tip is to plan your posting times. This enables you to have content go out at the most ideal times for your audience. In Buffer’s case you must manually select the times you wish to schedule for, so it is best to have an understanding of your social analytics to inform you when is best to post.
To find your posting schedule, press ‘settings’ under the social profile you want to set and select the ‘posting schedule’ tab on the main screen. Go back to queue when you have finished to see what you have scheduled.
You will notice that your new schedule of posting has been saved for you. A quick note here for later changes to schedules posting times – if you change your times, make sure you go back to your queue to check where this has moved your existing post schedule, because some things will have moved around (unless you have given them specific times and dates).
There are two ways to post. You can either; hover your cursor over the schedule and select a day for a content screen to pop up, or you can scroll to the top of the screen where there is a box that reads ‘What would you like to share?’
In essence the free plan is extremely basic, but I like it! You get;
3 social media account connections (which can be 3 Instagram accounts, or one of each platform choice for example)
10 posts per social account
Choice of image or video content, as well as text.
Simple to follow contents scheduling screen to create your content.
I love using Buffer for its very quick ease of learning and content addition, although it is the more basic of the social media schedulers I have used to date. So, if you do not feel like you are naturally tech savvy, then this is probably the tool for you to start with.
How do I schedule my content on Buffer?
Here is a video I created a while ago that shows you how to schedule content on the Buffer free plan;
Does Buffer offer integrations?
Yes. Buffer does have an extensive library of extensions and extras, so there is lots of opportunity to integrate apps to aid a cleaner workflow.
Is the Buffer free plan worth it?
As I have said, I do like the Buffer free plan, not only is it quick to use when you are busy creating content, but it is extremely easy to navigate and utilise by comparison to most, making it a great starter tool. The other thing that I think is really great is that you get to post video content, which is something most, if not all other social media management tools do not allow on their free versions. So, if budget is really holding you back from investing in more paid tools for your business, then Buffer is a good option to start with.
At some point in all honesty you will need to upgrade, particularly if you want to make the most of the tools that Buffer offer, which include things like;
Instagram first comment
Instagram stories
Instagram tagging
Instagram hashtag manager
Instagram shop grid
Instagram grid view (coming soon)
Post reporting
Teams
Browser extensions
And more
Top Tip
Free is not always best. In fact, there are occasions where opting for free plans void the benefits in time and strategy that you wanted to find from pre-scheduling content in the first place. So, take some time to really understand your needs vs. budget – what benefits do you get for each tier? Make your judgement and choose your perfect plan accordingly.


